Thursday, March 31, 2011

Stylish Blogger Award

      Ifeel honored and I absolutely thrill for this award being a relatively new blogger.
Thank you so much Stacy very sweet of you!


   Part of receiving this award means I have to do the following:
* Thank the person who gave you the award and link it back to their blog.
    Thanks again Stacy. Here is a little Note.

*Share 8 things about myself.
*Pass this award on to 8 bloggers that I have recently discovered.
*Contact the bloggers that you have awarded.
                     My 8 Things:
1.     I Believe and love my God Jesus Christ.
2.     I have been married to my Senior Master Sergeant Ben for 24 years. Retired for the Air Force after 29 years of service. Love Him.
3.     I have three Kids; Jesús (22), Keishla (20) & Vincent (19) all three in college and still living at home. I am Blessed!!!
4.     I am originally from Puerto Rico so my primary language is Spanish. Learn my slight English, listen and watching the News Channel. I am still learning.
5.     I have been stamping for 11 years but am new to SU as a Demonstrator.
6.     I love to teach and share what I know.
7.     I cry vey easily, watch movies with a tissue box by my side.
8. I love Flowers!! And I Love to Stamp!!

I would like to pass the Stylish Blogger Award to:    
Michele – parchmentpaperie 
Kelly Green –  Creativelyinked
Jen Andrews – boygirlboydesigns
Katherine – katherinesscrapnstamp 
Jo Olson – lovemakingcards
Tanya Boser – tinkerin-in-ink
Peggy – stampinpeg
Thanks for Visiting!!

Wednesday, March 30, 2011

Happy Easter!


Hidden the eggs for Easter was the idea for this Card.
 I stamp the tree image on Season of Friendship Stamp Set with the Early Espresso Write Maker and then cut it out.  Using dimensionals I attach the tree to a 5 x 3 ¾” piece of Whisper White CS. The leaves were stamp using the Write Maker colors Old olive and Wild Wasabi. I use the Itty Bitty shape Punch to punch out some flowers and then I run the flowers through the Big Shot with the Lattice Square EB to give them some texture. Using the egg image on the Easter Blossoms set, I stamp and cut out some in different colors. I make the fence by scoring and cutting a 3 ¾” x ¾” piece of Pear Pizzazz CS. The Mat is a Rose Red 5 ¼” X 4 piece of CS. The Happy Easter sentiment from the Teeny Tiny Whishes Stamp Set completes the card.
 Thanks for Visiting!!!

Supplies:
Stamp Set- Season of Friendship, Easter Blossoms, Teeny Tiny Wishes
Paper- Whisper White, Rose Red, Pear Pizzazz
Ink- Pear Pizzazz, Daffodil Delight, Wild Wasabi, Marina Mist, Regal Rose, Rose Red, Crumb Cake, Perfect Plum, Early Espresso, Write Markers: Wild Wasabi, Old Olive.
Punch- Small Oval Punch, Itty Bitty Shapes Punch, Crop-A-Dile
Accessories- Square Lattice EF, Big Shot, Dauber, Liquid Glue, Paper Snips, Dimensionals, Snail Adhesive

Tuesday, March 29, 2011

Easter Basket


     Here we have another goody for Easter. A Basket fills with candy, great for Easter Treats.
The basket was made with the Scallop Envelope Bigz Die. I give it some texture with the Perfect Polka Dots Embossing Folder. For the adornments I use a little chick punch art, grass, eggs and a sentiment. The eggs were made with White Embossing Powder I use the Easter Blossoms Stamp Set. The handle for the basket was a strip of ½” x 11” attach with brads.

Want to know how to make the Little Chick and Crack Egg?
Thanks for Visiting!!!


Supplies:
Stamp set- Easter Blossoms
Paper- Whisper White, Tempting Turquoise, Basic Black, Pumpkin Pie, Textured Ink Color (retired)
Ink- Tempting Turquoise, Daffodil Delight, Pumpkin Pie, Poppy Parade
Punch- 1 ¼” Circle Punch, 1 ¾ “Circle Punch, Itty Bitty Shapes Punch, Boho Blossoms Punch, Wide Oval Punch, Scallop Oval Punch, Heart to Heart Punch
Accessories- Crop-A-Dile, Scallop Envelope Bigz Die, Polka Dots (EF), Big Shot, White Embossing Powder, Heat Tool, Candy, Plastic Bag, Ribbon, Brads, Liquid Glue, Dimensionals, Snail Adhesive,

Saturday, March 26, 2011

Distressing


          Today’s Card is the result after playing with the Distressing Essentials Kit and a bunch of stamps.
The idea for the colors and layout came from a picture on my Doctor’s office.  Hope you like it.
Thanks for Visiting!!!


Supplies:
Stamp Set- Clearly for You, Bliss, Easter Blossoms, Artistic Etchings, Teeny Tiny Wishes, Watercolor Trio
Paper- Naturals Ivory, DSP Botanical Gazette, Soft Suede, Crumb Cake, Old Olive, Whisper White
Ink- Crumb Cake, Basic Black, Early Espresso, So Saffron Write Marker
Punch- Word window Punch, Curly Label Punch
Accessories- Distressing Essentials Kit, ½” Crumb Cake Seam Binding Ribbon, White Gel Pen, Clear Embossing Powder, Button, Heat Tool, Shimmer Paint Platinum, Hemp Twine, Glue Dots, Dimensionals, Snail Adhesive

Monday, March 21, 2011

Friend


                       I have a quick creation to share with you today.
 It is a combination of circles and punch colors; DSP Springtime Vintage with Marina Mist and Pretty in Pink. I make the flowers punching out shapes with the Itty Bitty and Boho Blossoms Punch.  With the Polka Dots embossing folder I give to the card some texture. The ribbon was cut on both long sides and take out some tread on each side for a flaky look, a sentiment (friend) finish the card.
Thanks for Visiting!!

Supplies:
Stamp Set- You’re a Gem
Paper- DSP springtime Vintage, Naturals Ivory, Old Olive,
           Marina Mist, Pretty in Pink
Ink- Basic Black
Punch- 1 ¼” Circle Punch, 1 ¾ “Circle Punch, Curly Label Punch,  
            Itty Bitty Shapes Punch, Boho Blossoms Punch                     
Accessories- 1” Bashful Blue Grosgrain Double stitched Ribbon
                    (retired), Basic Pearls, Polka Dots EF, Big Shot,
                    Liquid Glue, Snail Adhesive, Dimensionals   

Wednesday, March 16, 2011

Easter Bunny Goody


         I just started my engine. Why? …Easter will be here in a blink of an eye.
  So I start making my goodies.
 Today’s I am showing a Bunny Bag.  It is a 1x8 cellophane bag fill with Almonds. (Pastel colors) Yummy!
It has a Punch Bunny on top. 
I am planning to fill some of these bags with Jelly Beans too.
Want to know how to make the Bunny?  Click Here

Thanks for Visiting!!!


Supplies:
Paper-Whisper White, Tempting Turquoise
Ink- Tempting Turquoise
Punch- Oval Punch, Oval Large Punch, Scallop Punch, ½” Circle Punch, ¼” Circle Punch
Accessories- Wiggle Eyes, 1x8 Cellophane Bag, Candy, Liquid Glue, Glue Dots, Basic Black Write Marker

Tuesday, March 15, 2011

Sweet and Sour

         
   Happy Tuesday!
                    My post today is a Sweet and Sour card inspire for the flowers I saw in my strawberry plant.
Spring is here!!!!!
With the Tart and Tangy Stamp Set I create the citrus and sweet fruits. I use Crystal Effects for the glossy look, dimensionals for the 3D effect and a bow to finish the card.


Supplies:
Stamp Set- Tart & Tangy, Say it Simply
Paper- DSP Love patterns, Whisper White, Real Red, Daffodil
          Delight, Old Olive
Ink- Real Red, Daffodil Delight, So Saffron, Cherry Cobbler,
       Wild Wasabi, Certainly Celery
Punch- Square Punch, 1 ¼” Square Punch, 1 ¼” Circle Punch
Accessories- Crystal Effects, ½” So Saffron striped Grosgrain
                   Ribbon (retired), Dimensionals, Snail Adhesive         

Friday, March 11, 2011

Quilt Look


                       Today’s card is a simple Look like quilt one. The Springtime Vintage DSP is beautiful enough to embellish any card.
For the quilt look I punched out (12) 1 ¼" square pieces of DSP, glue it to a 5 ¼" x 4 Natural Ivory CS, and run it trough the Big Shot using the Square Lattice Embossing Folder. Put some Dimensionals on the sentiment from Punch Bunch Set, add ribbon, a bow and a pearl to finish the card.
Thanks for Visiting!!!

Supplies:
Stamp Set- Punch Bunch
Paper- Springtime Vintage DSP, Whisper White, Natural Ivory, Bashful Blue, Old Olive
Ink- Pear Pizzazz
Punch- Scallop, 1 ¼’ Square Punch, 1 ¼’ Circle Punch, 1 3/8’ Circle
                Punch     
Accessories- Square Lattice Embossing Folder, Big Shot, ½’ Seam          
                    Binding Pear Pizzazz Ribbon, Paper Piercing Tool,
                     Liquid Glue, Basic Pearl, Dimensionals, Snail Adhesive         

Thursday, March 10, 2011

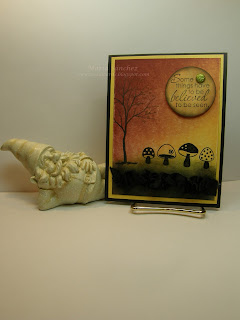
Brayer Technique


                   My sweet friend Jo loves the Brayer Technique and she is teaching me about it. So I made this card putting in practice what I know so far. I hope she likes it. Thanks Jo.
Recipe:
 I stamp the images using Basic Black with a different in the mushrooms were I use Versamark and clear Embossing Powder.         
 For the sky I use Daffodil Delight, Peach Parfait, Tangerine Tango, Rich Razzleberry (in that order) and brayer each color in angle over a Whisper White piece of CS. In the grass area I use Old Olive with the brayer and Basic Black with a sponge. I use Dimensionals for the sentiment and finish the card with a ruffle BB Ribbon and a Brad.
Thanks for Visiting!!

Supplies:
Stamp Set- Funky Four, Just Believe, Branch out (retired)
Paper- Daffodil Delight, Basic Black, Whisper White
Ink- Daffodil Delight, Tangerine Tango, Rich Razzleberry, Peach Parfait
        Old Olive, Basic Black               
Punch- 1 3/4” Circle Punch
Accessories- VersaMark, Clear Embossing Powder, Stazon, Sponges, Brad,
                   5/8” Basic Black Grosgrain Ribbon, Dimensionals, Snail Adhesive  

Monday, March 7, 2011

Hope


             Today’s Card is a dedication to the patients and all survival of Breast Cancer. 
--Hope is that thing with feathers that perches in the soul and sings the tune without the words and never stops... at all.  ~Emily Dickinson—
In the card I frame the pinwheel and sentiment with the Embossing Folder Framed Tulips, Dazzling Diamonds and Pearls finished the card. 
Thanks for Visiting!

Supplies:
Stamp Set- Thoughts & Prayers
Paper- DSP Love Patterns, Whisper White, Pink Pirouette
Ink- Pretty in Pink
Punch- 1 ¼” Square Punch
Accessories- Embossing Folders: Vintage Wallpaper, Perfect Polka Dots,
                   Frame Tulips, Big Shot, Basic Pearls, Dazzling Diamonds,
                   Dimensional, Snail Adhesive  

Thursday, March 3, 2011

Gracias (Thank You)


                               I made this card for a Spanish Swap. One of the two Stamp Set use here is my all time favorite Inspire by Nature. The Itty Bitty flowers were Inlaid (love the technique) to the Natural CS with the Lattice Square Embossing Folder. I stamped, punch and cut out the butterflies. And for the finish touch some Pearls and Dazzling Diamonds.  
 Thanks for visiting!!!!

Supplies:
Stamp set- Inspire by Nature, Vuelo de la Mariposa (sentiment)
Paper- Tempting Turquoise, Whisper White, Naturals Ivory
Ink- Tempting Turquoise, Certainly Celery
Punches- Oval large, Oval, Butterfly, Itty Bitty Shapes
Accessories- Square Lattice Embossing Folder, 2 Way Glue Pen
                   Big Shot, Liquid Glue, Basic Pearls, Snail Adhesive
                    Dazzling Diamonds (glitter), Dimensionals
                            

Wednesday, March 2, 2011

Flower Pot


                         This is a Mother’s Day card using the Fun Flowers Die. I made the pot, insert a tag with 3 flowers where I left some space for any message. Cut the word MOM from the Stamp Set Mother of Mine. I give to card a marble look using Frost White Shimmer Paint and the Spritzer with Basic Black ink. For embellishments I use a Bow.
 Thanks for Visiting my Blog!

Supplies:
Stamp Set- Mother of Mine
Paper- Basic Black, DSP Neutrals, DSP First Edition,
           DSP Botanical Gazette, Soft Suede
Punch- 1 ¼” Circle Punch
Ink- Early Espresso, Basic Black Write Marker
Accessories- Fun Flower Die, Big Shot, 3/8” Very Vanilla Taffeta Ribbon, Frost   
                        White Shimmer Paint, Spritzer, Dimensionals, Snail Adhesive   

Tuesday, March 1, 2011

Magnet Metal Board


I’m showing you today what I made with a metal board found in a local craft store.
                         
I began with this sheet of metal.


Using the Paper Piercing Tool I poke the paper thru the existing holes to add ribbon later.


I use stripes of Basic Black CS to cover the edges.


I covered with Designer Series Paper Neutrals using Liquid Glue.


Here is the Metal Board with the ribbon for hanging.


I put together some magnets using another great find and Crystal Effects.


The Metal Board with the Magnets


Final Look!!!


Supplies:
Stamp Set- Clearly For You
Paper- DSP Neutrals, Basic Black
Ink- Basic Black
Accessories- 5/8” Basic Black Satin Ribbon, Liquid Glue, Crystal Effects,
                         Paper Piercing Tool
Metal Board and Magnets Local Craft Store  
Related Posts Plugin for WordPress, Blogger...